Creating a Dungeon
In this tutorial, we're going to cover how dungeons are built while adding some basic tweaks. We are going to:
- Make a new Dungeon with new properties
- Make a new Level Rule Set with new properties
- Change the enemies that spawn in the Dungeon
- Hook the Dungeon into an existing overworld
The idea here is not to go through the process of making a ton of new content, but rather to expose the underlying structure of how levels are put together. What we're going to do is add a new catacombs dungeon to the Salt Barrens area, increase the size of the dungeon, add different monsters and make sure it's appropriately leveled. This tutorial covers a wide range of content and will link to a lot of other pages. Most of these links are for reference, but can provide useful information. It may be necessary to go through this tutorial more than once in order to get comfortable with setting up dungeons.
Before starting, it would be a good idea to read Creating a Mod if you haven't already.
Contents
|
The Basic Parts
The biggest components to making an area that you can actually play in are the Level Chunks, Level Rule Sets, and Dungeons. These are detailed in the Level Building Overview. We won't be making any level chunks in this tutorial, but we will be making Level Rule Sets and Dungeons.
Making a Dungeon
We could either start by making a new Level Rule Set or a new Dungeon, but for the sake of being able to see something immediately in-game after doing a single thing, we're going to go with making a Dungeon first. Details on Dungeons here.
Cloning an Existing Dungeon
By far the easiest and least error-prone method of making a new dungeon is to clone an existing one. Why set every detail up by hand if you can take something that already works and tweak a few values?
- Open Guts and go to Data Editors -> Dungeons
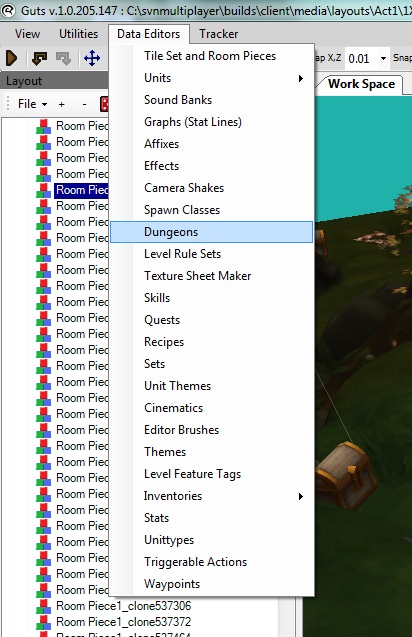
- Right Click on one of the Catacombs dungeons and select "Clone"
- Under "File" replace "catacombs" with "DesertCatacombs" and select OK.
Congrats! You now have a new dungeon that you can modify to your heart's desire.
Modifying Your New Dungeon
Now that we've cloned a Catacombs Dungeon, we're going to have to change a lot of stuff in it in order to make it work in the second act. Dungeon Data is the only tab in the DungeonEditor form you have to worry about. Affixes are primarily for maproom functionality, and Themes are beyond the scope of this tutorial. Modify the following fields with the DesertCatacombs dungeon selected.
Basic Data
- Name: Change this to DesertCatacombs. In-game, you can type "dungeon DesertCatacombs" to get to your dungeon. (NOTE: This will flag your character for cheating, so be sure to use a throwaway character if this is a problem for you.)
- Display Name: Change this to whatever you want. This will display in the top right hand of the screen when you're in-game.
- Parent Dungeon: Change this to "OSSEANWASTES". When you use a standard exit, you will go to this dungeon. Beings we're putting this dungeon in the Ossean Wastes, that should be the parent dungeon.
- Parent Town: Change this to "Zeryphesh". When you die, you'll spawn here if you choose town. If you use a waypoint scroll, Zeryphesh will be where you return to.
- Player Level Match Range: This is the level of the monsters that you'll find in the area. To determine the best level range, save the dungeon (There's a green save button in the top left of the Dungeon Editor.) and then navigate to the OsseanWastes dungeon. Once there, you'll notice that the player level match range is 21-23. Using this information, we can guess that if the player starts in the Ossean Wastes around that level range, they'll probably be a level or two higher by the time they get to a dungeon there. Navigate back to DesertCatacomb and set the Player Level Match Range field to 22-25.
Stratum Data
Now that you're back in the DesertCatacombs dungeon, we're going to work with stratum. These are basically different types of areas that can be in the same dungeon. The most common types of dungeons have two stratum: A main floor and a boss room, and that's what we're going to use for this tutorial. Make sure STRATA0 is selected in the "Strata" area, and then get ready to start setting some more fields.
- Champion Spawn: Set this to Champions_Vault1
- Monster Spawn: Set this to Vaults_1 for now. We'll make a new spawn class for monsters later on. If you want to change the density of spawns, you can do this in the "Per Meter" field.
Now, click on STRATA1 and set the following fields:
- Champion Spawn: Set this to Champions_Vault1
- Monster Spawn: Set this to Vaults_1 for now.
Save the data.
Playing the Dungeon
Before loading the game, be sure to have the console enabled. Info for Enabling the Console here.
Once in the game, start or load a character and open the console. Then enter "dungeon DesertCatacombs" to go to your new dungeon. You should be transported to a new catacombs dungeon with a variety of new features added. In particular, you'll notice that the catacombs are populated with vault monsters instead of catacombs monsters. You will still notice a few skeletons here and there, as they were hand-placed in the levels.
A waypoint portal should take you to Zeryphesh, and exiting via the stairs up or by completing the dungeon will bring you to the entrance to Ossean Wastes. You are returned to the entrance because you did not actually use a warper to get to the dungeon. Once we add a proper dungeon entrance to Ossean Wastes, you will return to the proper location. Still, it's important to note that you return to the Ossean Wastes.
Creating a New Level Rule Set
Under Data Editors, you can also find the option to open the Level Rule Sets Data Editor. Open this now.
You'll notice the window looks similar to the Dungeon Editor's window. You can learn about Rule Sets and the Level Rule Sets Editor here.
- Navigate to media/layouts/catacomb/defiledcrypt_small_rules.template
- Right click on this and select "Clone"
- In the window that pops up, change the filename to "DesertCatacombs_rules"
- In the clone field, be sure to specify the media/layouts/catacomb/defiledcrypt_small_rules.template path and make sure the check box is checked.
- In the field on the left, make sure the media/layouts/catacomb path is selected.
- Press the OK button.
- Locate media/layouts/catacomb/desertcatacombs_rules.template and select it.
Modifying a Level Rule Set
Now that we have a new level rule set for our desert catacombs, it's time to start making some changes. The display name is going to get overwritten by the dungeon name, but you can make it the same as the dungeon name if you want.
At the Very Top
- Name: DesertCatacombs
In the Data Tab
- Music: Set this to ../music/2interiorb.ogg or any other musical track you prefer.
- Min Chunks: 4
- Max Chunks: 5 (You're welcome to make these large or smaller.)
- Camera Angle: 5 (This will skew the angle by 5 degrees)
In the Chunk Types Tab
In this tab, we're going to allow the random generator to pick from all of the entrances instead of just two of them. When you add an inclusive chunk, it only lets the randomizer pick from those chunks. If you don't specify any chunks, it will pick from any chunk in the folder.
- Scroll through any chunk types with ENTRANCE in the name, and notice that there are a few chunks listed as Inclusive Chunks
- Remove these by clicking on the Modify button beneath the Inclusive Chunks box and moving all chunks into the window on the right.
In the Themes Tab
- Use the X to delete the two theme elements from this window. It's set up for the Defiled Crypt's theming, and we don't want that. More infor on Themes here.
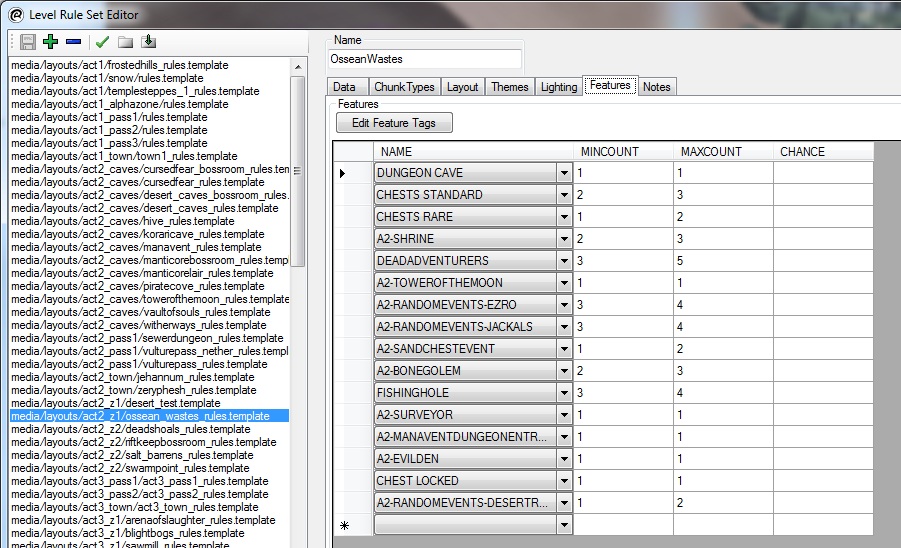
In the Features Tab
This tab specifies how many features should be added to a level. This lets us do things like allow us to hand-place chests so they look appropriate, but also give the appearance of randomness. If you increased the size of the level (in Min Chunks and Max Chunks) you should increase the number of goodies that occur in the level as well.
Creating a New Monster Spawnclass
In this section, we're going to blend together the Vault monster spawns with the Catacomb monster spawns. More info on Spawn Classes and the SpawnClass Editor here.
- In Data Editors in the top menu bar, select "Spawn Classes"
- Press the leftmost green "+" icon.
- Name the new Spawn Class "DesertCatacombs_Monsters"
- Under Spawn Class, select VAULTS_1
- Press the rightmost green "+" icon to create a second Choice
- Under Spawn Class, select CATACOMBS_UNDEAD
- Set the weight of both of these Choices to 1, and set the Min and Max on both Choices to 1 as well.
- Save the new Spawn Class
Plugging in New Rules and Spawn Classes into Your Dungeon
- Open the DesertCatacombs dungeon
- For STRATA0, set the Rule Set to your newly created media/layouts/catacomb/desertcatacombs_rules.template
- For STRATA0, set the Monster Spawn Spawn Class to DESERTCATACOMBS_MONSTERS (You will need to close the Dungeon Editor window and open it back up to see the new spawn class.)
- For STRATA1, set the Monster Spawn Spawn Class to DESERTCATACOMBS_MONSTERS as well.
Once you've done this, save and load up Torchlight II once again, and use the console to go to "Dungeon DesertCatacombs". If you would like to reroll the dungeon, you can type "Dungeon DesertCatacombs, 56752" or any number, really. That will roll the level with a specific level seed and repopulate the level accordingly. You'll see that you get an assortment of vault monsters as well as catacombs monsters.
Putting Your New Dungeon In-Game
All About Level Feature Tags
Now that you have a dungeon, you'll want to hook it into the actual game. It's not quite as simple as dropping a dungeon entrance into a layout because the Ossean Wastes is randomized. Most of the layouts in Ossean Wastes have a specially-made layout link already placed that acts as a dungeon entrance. Between zero and two of these layout links exist in each level chunk, and we're going to randomly use one of these possible dungeon entrances as the way to get into the dungeon.

You can look at the Level Feature Tag for the group containing these random dungeon entrances (You'll find that it's "DUNGEONS RANDOM".) and then you can open the Level Rule Set Editor and navigate to media/layouts/act2_z1/ossean_wastes_rules.template. Once you have this selected, click on the features tab. You'll notice that there isn't actually a "DUNGEONS RANDOM" feature listed here, although there is a "DUNGEON CAVE" feature.
At this point, it may be good to read up on the details regarding Level Feature Tags. Here is a Tutorial on the subject.
If you click on "Edit Feature Tags" you'll notice that there's a "DUNGEON CAVE" Feature Tag listed there. If you click on the + symbol, you'll see that it inherits from "DUNGEONS RANDOM".
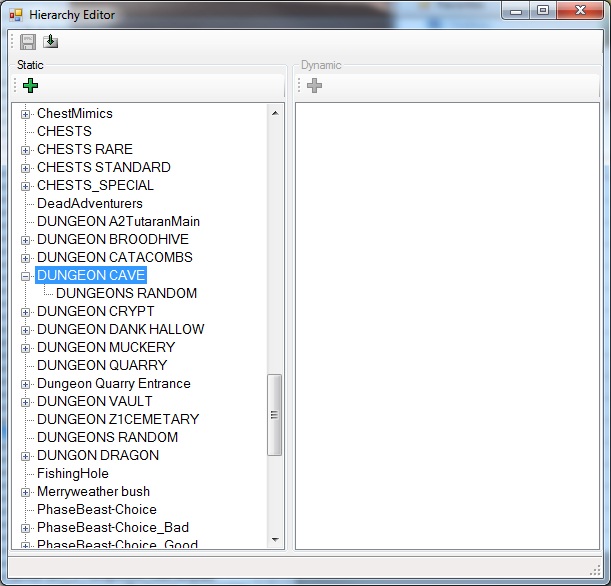
When the game is building a level, a feature tag of "DUNGEON CAVE" will actually cause the game to look for groups tagged with "DUNGEON CAVE" as well as the parent feature tag "DUNGEONS RANDOM". If it finds a DUNGEON CAVE tagged group first, it will choose to use whatever is in that group. If it finds something tagged DUNGEONS RANDOM, it will first look inside that group for a layout link. Then it will open the layout link and look for a group inside of that with the tag DUNGEON CAVE. It will then pick what is in that group.
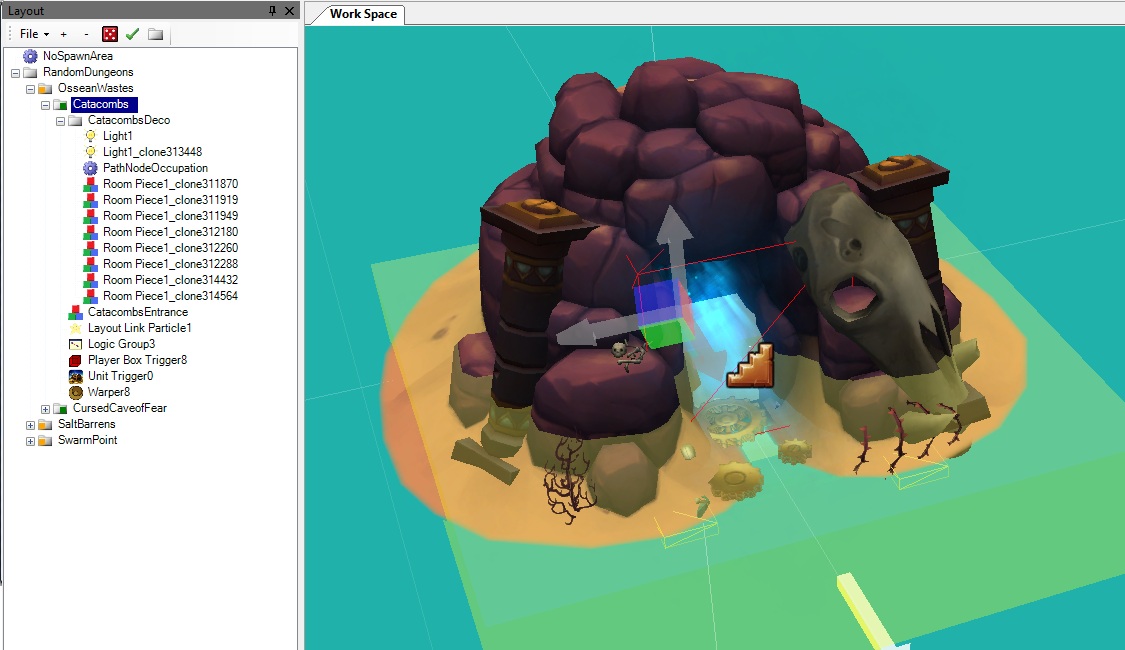
The layout link that is placed in the level chunks can be found at media\levelSets\props\Z2Desert_props\A2-RandomDungeonEntrances.layout. If you open it up, you'll find that there is a themed group called "OsseanWastes" (more on Themes, but it basically means that the group is set up to only appear in Ossean Wastes) and inside of that group are two more groups. One is called "Catacombs" and the other is the "CursedCaveofFear". You'll notice that the CursedCaveofFear group is tagged as DUNGEON CAVE (just like in the Ossean Waste's Level Features). You'll also notice that the "Catacombs" folder is tagged with the DUNGEON CATACOMBS tag, but this tag is currently not listed in the Ossean Waste's level feature tags.
Setting Up the Tags
NOTE: The when entering data into fields in the editor, you will usually need to press enter or click on another field before saving in order to save everything. The previous section covered the various parts that will need to be connected, and in this section we'll actually do some connecting.
- Open the Level Rule Set Editor and navigate to media/layouts/act2_z1/ossean_wastes_rules.template.
- Go to the Features tab.
- Add a new tag to the list, and set it to:
- Name: DUNGEON CATACOMBS
- MinCount: 1
- MaxCount: 1
- Save the Level Rule Set Editor (be sure to press enter before saving)
- Open the layout media\levelSets\props\Z2Desert_props\A2-RandomDungeonEntrances.layout
- Open the groups RandomDungeons -> OsseanWastes -> Catacombs
- Select the object Unit Trigger0 and change the following properties:
- TEXT: Enter [the name of your new dungeon. This text will be what you see when you click on the dungeon in-game.]
- DUNGEON: DESERTCATACOMBS
- Select the object Warper8 and change the following properties:
- DUNGEON NAME: DesertCatacombs
- Open the Logic Group3 object and make the following connections: (Basic Scripting Tutorial)
- Connect "Triggered" on Player Box Trigger8 to "Activate Warper" on Warper8.
- Connect "Triggered" on Unit Trigger0 to "Activate Warper" on Warper8.
- (Optional) Move the decorations in the CatacombsDeco group to appropriate locations. To help you see better, select the CursedCaveofFear, SaltBarrens, and SwarmPoint groups and set their "Visible in Editor" flags to FALSE.
- Save the layout.
For more information on connecting dungeons, there is a Connecting zones tutorial.
Finding Your Dungeon In-Game
At this point, you should be able to find an entrance to your dungeon in the Ossean Wastes. Here are a few console commands to help you out:
- Dungeon OsseanWastes, [number] this will let you go to the Ossean Wastes and roll it with any level seed you want.
- killall kills all of the monsters
- godspeed enables godmode and lets you go really fast
- revealall reveals the whole map so you can find your dungeon entrance right away.
The End
This should be enough information to get you feeling comfortable with all of the major parts of creating a new dungeon and hooking it up in-game. Please refer to this tutorial for packaging your mod and releasing it to the public.