Exporting an Animation
From Runic Games Wiki
The Basics of exporting animations for GUTS
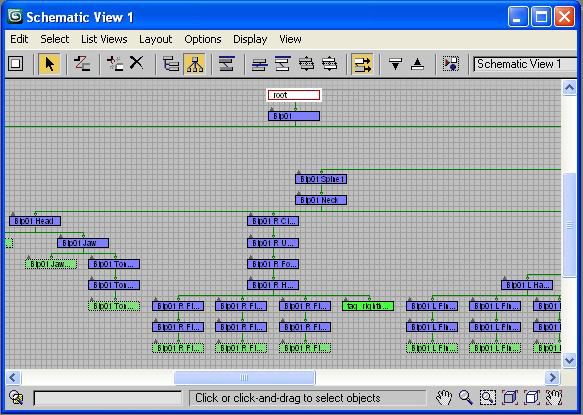
Preparing the rig for export:
- The master node in the hierarchy must be called “root”. All other bones are attached to this. The mesh objects should not be weighted to the root node.
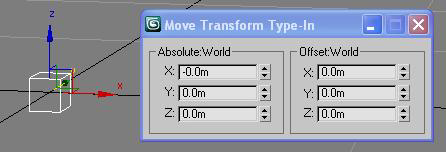
- The root node should remain at the 0 point for all 3 axis, X, Y, Z. Offset from the 0 point will mean it is also offset in the engine.
- The mesh objects must be labeled with an “m_” before the name of the object.

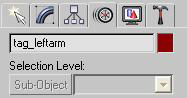
- Nodes that are meant for weapon or shield attachments should be labeled with a “tag_” before the name.
- Torchlight II uses, "tag_righthand", "tag_lefthand", and "tag_leftarm" is used for shields.
- Skinned meshes in 3DS Max should use the “Skin” modifier and not “Physique”
Exporting a Character:
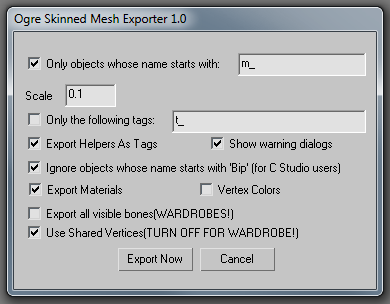
- Use the “Ogre Skinned Mesh” exporter.
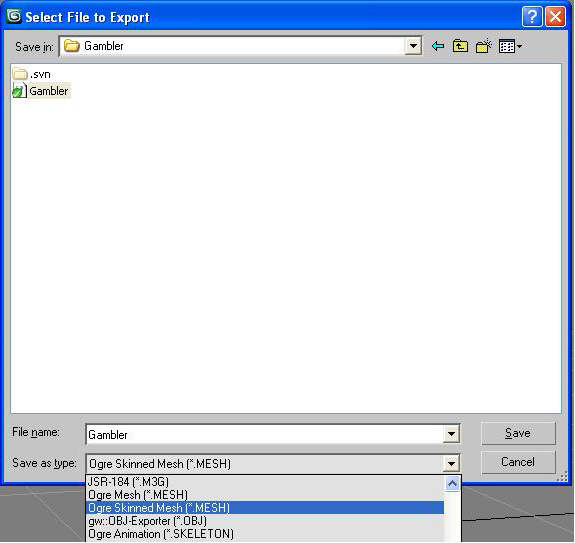
- Name the file - usually the same as the name of the mesh. You cannot have spaces in the name of the file but you can use other characters.
- Example – can’t do, “huge monster” but you can do “huge_monster” The name of the file will need to stay consistent because it’s used in many locations throughout the editor.
- Next the Ogre Skinned Mesh Exporter dialog box comes up.
- By default : check boxes for the following are on - “Only objects whose name starts with: m_”, “Export Helpers as Tags", "Show warning dialogs", "Ignore objects whose name starts with ‘Bip’ (for C Studio users)”, "Export Materials", “Used Shared Vertices(TURN OFF FOR WARDROBE!)”
- Export all visible bones(WARDROBES!)
- The base rigs for our player characters have bones that hang from the hips that are used to animate the various tassets and coat tails of our armor sets. These cloth bones don't always have vertices weighted to them but must be included when exporting if the character is to work.
- Occasionally variations and alternate versions of monsters will share the same rig and animations and will need to be exported with "All Visible Bones" checked on.
- Scale is set to “0.1”. Torchlight’s unit scale is set to meters. 1 unit = .1 meter.
- This creates 2 important files, a “Material” file and a “Mesh” file. The material file points to the texture for the mesh and its texture properties, such as level of emission or paths for alpha maps. The mesh file is the model itself. You’ll notice also a file called OgreXMLConverter.txt and a Gambler.MESH XML file. It’s ok to ignore those files; they do not get used by the engine.

- Make sure the appropriate texture is in the same directory as the material and mesh files.
Exporting an Animation – Creating the Bind File:
- Make sure the export location is the same directory as the “Material” and “MESH” files.
- You cannot have spaces in the name of the file but you can use other characters.
- Example – can’t do, “huge monster” but you can do “huge_monster”.
- For the first animation file, you are creating a “Bind” file. Animation files have an External and Internal name. The external name is the name of the actual file, and the internal name is what the engine sees.
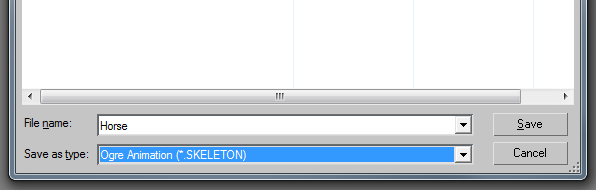
- Use the “Ogre Animation” exporter. Call the file the same name as the MESH file. This is the External name.
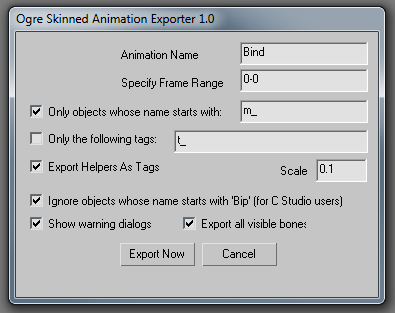
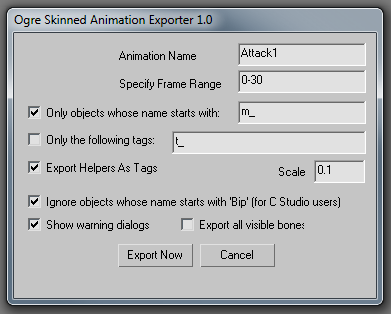
- In the Animation Exporter dialog box, the “Animation Name” has to be “Bind”. This is the Internal name. It stores all the information for the skin; all the vertices and bones and their relationship.
- Specify Frame Range - set this to the first frame of your animation with your character in a neutral pose. Example: “0-0” it will now export from frame 0 to frame 0.
- This pose must be the same for the Mesh and Bind files.
- By default : check boxes for the following are set to on – “Only objects whose name starts with: m_”, “Export Helpers As Tags”, “Ignore Objects whose name starts with ‘Bip’ (for C Studio users)”, “Show warning dialogs”.
- Don't forget to check "Export All Visible Bones" if necessary
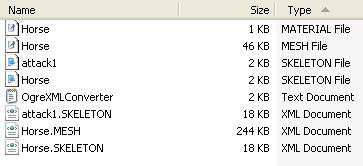
- 2 new files are created; “Horse.SKELETON”, and “Horse.SKELETON.XML”. Again the XML file here is not used by the engine, but can be handy for troubleshooting.
Exporting an Animation – Creating Animation Files:
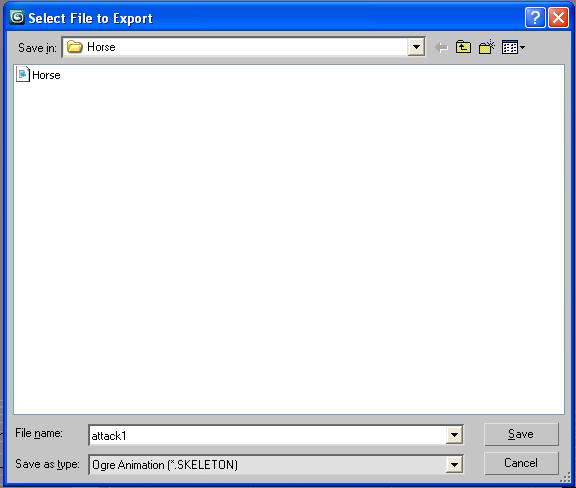
- Make sure the export location is the same directory as the “Material” and “MESH” files.
- Name the animation file (External Name). Example – Attack1
- Next, in the Animation Exporter dialog box, set the “Animation Name” (Internal Name).
- Example – Attack1
- Set the frame range of the animation
- Export.
- Two new files are created; “Attack1.SKELETON”, and “Attack1.SKELETON.XML”. Again the XML file here is not used by the engine, but can be handy for troubleshooting.
- Repeat these steps for all the animations of your character.