Level Building Overview
This is a basic overview of how all of the level-related bits and pieces go together. This will eventually cover all of the information necessary to create a new area from the ground up.
Contents |
The Three Main Parts
These are the three most important parts of building levels and getting them into the game. Very briefly:
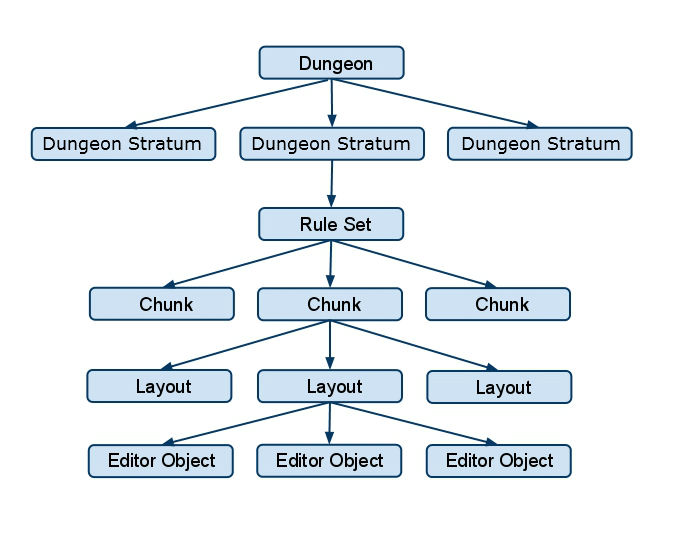
- Level Chunks define what the level is made out of - what art pieces it uses and what it will look like.
- Level Rules Sets determine what Level Chunks are used, and general details about lighting, environmental effects like rain, and music.
- Dungeons use one or more Level Rules Sets (one per floor) and define information like enemies, spawning distribution, and appropriate level.
Level Chunks
Level chunks are the hand-crafted, decorated areas that you walk around in. Level Chunks are made out of Level Objects. These can be stand-alone areas like towns or passes, but generally they are parts of levels and get assembled into complete levels by the Rule Sets. Level chunks are built in the editor and saved as Layouts.
Rule Sets
Rule Sets are built in the Level Rule Sets Editor. These determine what randomized chunks are used and how they fit together. The Level Rules also determine art-related things such as lighting, music, environment (floaty particles, rain, day-night cycle), aliasing (for example choosing between snowy or non-snowy areas), themes( mostly for turning on and off decorations in chunks so they can be reused for many locations ), and level features (used to determine what types of chests, special events and other things are used, and how many of them to use).
Dungeon
The Dungeon uses a Level Rules Set (or multiple Level Rules Sets if you are using multiple stratum, for example like when you have a boss room at the lowest floor of the dungeon) and then adds a bunch of data to it in order to make a finished, playable area. The Dungeon carries information regarding what types of monsters spawn, how frequently they spawn, the level range, the parent dungeon (where you go if you take an exit portal), the parent town (where a Town Portal will take you, or where you restart if you die).
Level Building Workflow
Start Off By Building a Chunk or a Standalone Level
When building a level, you can either create a Level Chunk or a standalone level. A Chunk is only a part of a level, which is then put together with other Chunks by a Rule Set. These Chunks need to be built in a certain way in order to fit properly together with other chunks. There are usually template files that you can work off of, or you can find an existing Chunk that's the same general shape as one you want to make and delete everything except for the connecting edges.
A standalone level doesn't have to connect to anything, so you don't have to build off of a template or existing chunk. You still need to use a Rule Set and a Dungeon to get it into the game, though.
Make The Basic Shape
Use floor pieces, walls, and large blocking pieces to rough in your level. Occasionally play in your level to make sure that views line up properly and the general layout is how you want it. It's not going to look good at first, but that's ok. The less decoration you do at first, the easier it will be to make changes.
Add Big Decorations
At this stage, you will want to put large objects like trees, big rocks and tables into your level. Be sure to actually play in the level every so often to make sure it's going in the direction you want. Add anything that may block the player's view or impede the player's path. Also, adding randomized decoration layout links would be good to do at this point because they're easy to put in and move around and help make the space look good. Run around in your level and make sure there aren't any large structures that unnecessarily block your view. It's not fun to get stuck behind a cliff while fighting a bunch of monsters.
Add Scripting, Level Features and Loot
Before getting into fine detailed decoration, add any monster spawners or other scripted events and play in the editor with some monsters populating the level. Enemies might spawn in weird places, but don't worry about that for now. Just make sure the area is good for fighting enemies and any scripting you're doing works. Now would also be a good time to add Level Features and loot to your level.
Add Detail Decoration
At this stage, add all of the trim needed to make the space look really good. This can be daunting, but the Paint Tool is your friend here. You can use it to quickly add small decorations to your space. At this point, you want to make sure that you don't see huge expanses of flat, repetitive walls and floor. This phase also includes placing shadows in certain tilesets.
Turn Off Unnecessary Collision
After building a level, there will be a lot of pieces in inaccessible areas that have collision turned on. This makes the game load more slowly and can affect performance. Pressing Ctrl+Shift+K will turn on Collision View Mode. You can then select offending pieces and turn off their collision.
Pathnode Handling
Pathnodes are automatically drawn wherever there's walkable (red) collision. You can use Pathnode Occupation Boxes to make those path nodes not show up on the map as well as make them not walkable. You can use No Spawn Boxes to prevent enemies from spawning in certain areas as well. It is good to use these at entrances so the player doesn't get swarmed with a ton of monsters as soon as they enter your level. You also want to add Jump Downs to your level at this point.