Basic Scripting
Contents |
Overview
This tutorial will cover the basics of how to set up scripting in a level using the Logic Editor. This includes creating a Logic Group, adding and linking nodes in the Logic Editor, and a few examples of simple scripts. It will assume you already have a fundamental understanding of how to navigate and use the GUTS editor.
Logic Groups
Logic Group objects contain various interconnected nodes of objects which are used to define the behavior of a script.
Creating Logic Groups
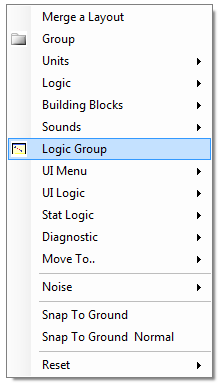
To create a Logic Group right-click on an empty space in the Layout Scene Manager and choose Logic Group from the list.
Editing Logic Groups
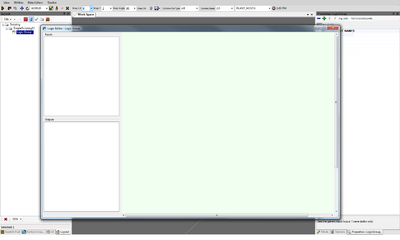
To edit a Logic Group select it in the Layout Scene Manager and then click the External Tool button ![]() on the tool strip at the top of the Layout Scene Manager to open the Logic Editor window.
on the tool strip at the top of the Layout Scene Manager to open the Logic Editor window.
Adding Objects to Logic Groups
Logic Group objects are empty by default so objects must be added to them using the Logic Editor. There are several ways to add objects to a Logic Group:
- Left-click and drag an existing object in the Layout Scene Manager in to the Logic Editor window.
- Select one or more existing objects in the Layout Scene Manager and then right-click in the Logic Editor window and choose "Add Nodes Selected in Layout Scene Manager".
- Right-click in an empty space in the Logic Editor window and choose "Create Object" followed by the specific type of object to add. This will create a new object and place it in the root of the Layout Scene Manager.
The same object can be added to a Logic Group multiple times. This allows an object to be linked to itself if necessary.
Moving Objects in Logic Groups
Left-click and drag objects in the Logic Editor window to move them around. This is useful to keep the Logic Group organized and, more importantly, create enough space between objects to properly link them together. Multiple objects can be selected and moved in two ways:
- Middle-click on objects to highlight them with a purple circle.
- Middle-click and drag to marquee select multiple objects and highlight them with purple circles.
Any objects highlighted with a purple circle will be moved when any object is moved. Middle-click on an empty area in the Logic Editor window to remove the highlight from all objects.
Removing Objects from Logic Groups
To remove an object from a Logic Group right-click on it in the Logic Editor window and choose "Delete Object: Object Name". This will remove it from that specific Logic Group, but will not delete it from any other Logic Group or the level itself.
Linking Objects in Logic Groups
Once objects have been added to a Logic Group they must be linked in order to do something. Every object has a variety of Input and Output events which are used to define the behavior of a script ( the available Input/Output events for an object can be viewed on the left side of the Logic Editor after selecting an object in the Logic Editor window ). There are two ways to specify which Input/Output events should appear as connection points available for linking:
- Select an object in the Logic Editor and check/uncheck the desired checkboxes on the left side of the Logic Editor window.
- Right-click on an object in the Logic Editor and choose either "Input Trigger" or "Output Trigger" followed by the desired Input/Output event.
Available Input/Output events appear above/below the object as either blue circles for Input events or green squares for Output events. These connection points are what must be linked to create the intended behavior of the script.
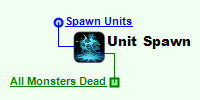
To link objects left-click and drag a line from an Output connection point to an Input connection point. To quickly link an Output connection point to multiple Input connection points Shift + Left-click on an Output connection point and click on multiple Input connection point while keeping Shift held down.
Un-Linking Objects in Logic Groups

There are a few methods for breaking a link between objects in the Logic Editor:
- Highlight the desired link by selecting the attached Input or Output connection point. Then right-click on the red circle in the middle of the link and choose "Delete Link: Output Event".
- Right-click on an Input or Output connection point and choose "Delete # Links to/from: Input/Output Event" to remove all associated links to that connection point.
- Delete an object from the Logic Group to remove all associated links to that object.
Examples
A few examples of basic scripts: