Missile Particles and Ribbons
This tutorial will show you how to make a particle system for a missile, which is what we call any sort of projectile. It could be an arrow, a fireball, or an actual rocket-powered missile. We're also going to make a ribbon particle, since they're useful for missiles, and a system that releases particles over distance instead of over time.
I'm not going to explain click-by-click how to add affectors or change properties in this tutorial, if you have trouble with that then try running through the Your First Particle System tutorial.
We'll start with the non-ribbon system. Create a particle with an emitter. On the particle system, change these properties:
- Set the particle's Texture to: media\particles\Textures\Glowglow_aura_bright.dds
- Change the Render Style to additive
Then, on the emitter change these properties:
- Make ParticleLife random from .4 to .8
- Set Velocity to random 0 to 2
- Set Angle to 180, so the particles will shoot in every direction
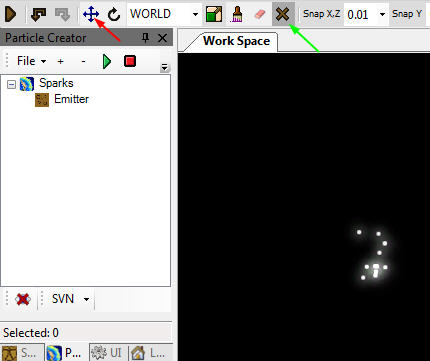
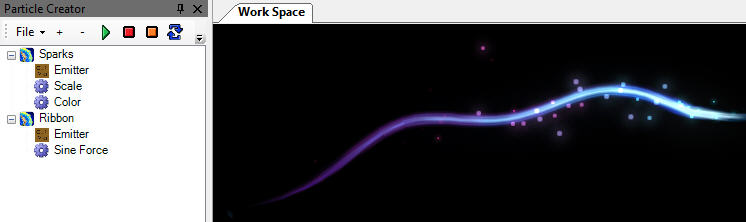
Hit the green play button to see our progress. You may want to hide the big multi-colored cube that lets you drag objects around by using the button the green arrow is pointing to below. You can always turn it back on with the arrow the blue arrow points to. Also, notice that I've renamed the particle system to "Sparks". You should get in the habit of renaming systems so that you can tell them apart when you have a bunch of them.
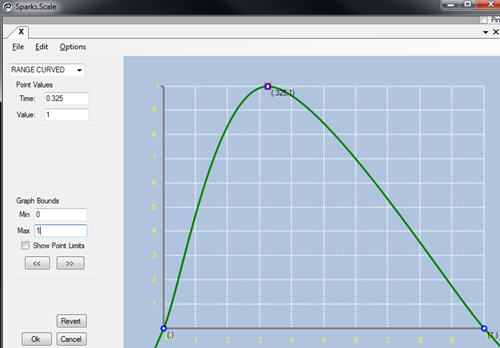
Now, add a Scale affector. We're going to use this to make the particles scale up to appear, and then scale back down to nothing over time. It's usually best to either scale or use the color affector to fade particles in and out at the beginning and end of their lives, so that they don't just abruptly pop in and out of existence. Sometimes you'll want the pop, like with lightning effects, but usually it just looks shoddy. For this system, we're using scale to make the particles come in and out of existence smoothly.
Be sure to set the Scale affector's Fixed attribute to true so it scales uniformly, then set X up like this:
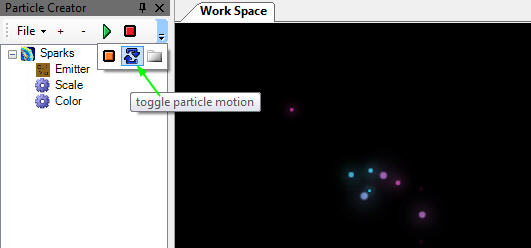
Our sparks could use some color, so go ahead and add a Color affector. Open up the Color Over Time property and change the color of the first node, and then add another node to the end. Pick any colors you want for these nodes, but keep them bright or our particles will be hard to see.
Alright, lets add some motion and start making this system more like a missile. Click the circular arrows button pictured below, it will either be to the right of your green play button or under the drop down arrow in that spot depending on how your panes are scaled.
Now your particle system will be moved in a circle, which helps you see what it would look like if it were attached to a missile. You can change the size and speed of the circle under Utilities -> Particle Movement, but leave it alone for now.
Just because it's an important property for you to know about, look for the Keep Local property on the Emitter, and change it to True. Now all of the particles are moved with the system. You'll use this property a lot if you make particles, and this is a good time to see what it does. We're not actually going to use it now though, so change it back to False.
Now, look for the Release Over Distance property and change it to True. Now your particle system will always release the same amount of particles over a given distance, no matter how fast or slow it's moving. If it's not moving at all, it won't release any particles. If you press the green play button now the system will stop moving in a circle and go back to the center, and no particles will be emitted. Click the rotating circle button to get it moving again.
Particles that release over distance release more evenly over distances than particles that release over time.
It's emitting a ton of particles right now, so lets turn it down a bit. Set the EmitRate to 5.

Lets create our ribbon now.
Create a new particle system. Make sure it's not inside the Sparks system! Name it Ribbon and set these properties:
- Set Texture to media\particles\Textures\Trail\trail41.dds (Or any other one that catches your eye
- Set Render Style to additive
- Change Render Type to RibbonTrail
- Change Visual Quota to 1 (This is really important for ribbon trail systems. Keep the quota as low as the number of ribbons you intend to have, or you'll needlessly hurt performance)
Add an Emitter to your new ribbon system. Set these properties:
- Change Velocity to 0
- Change Keep Local to true
- Change EmitRate to 1
- Change EmitDuration to 0
- Change No Expiration to True
Hit the circular arrows to reset your systems and get them both moving in a circle. Note that we're creating just one particle that lasts forever. An emit duration of 0 means that the system will emit all it's particles in one burst and then be done, and No Expiration means those emitted particles will never die.
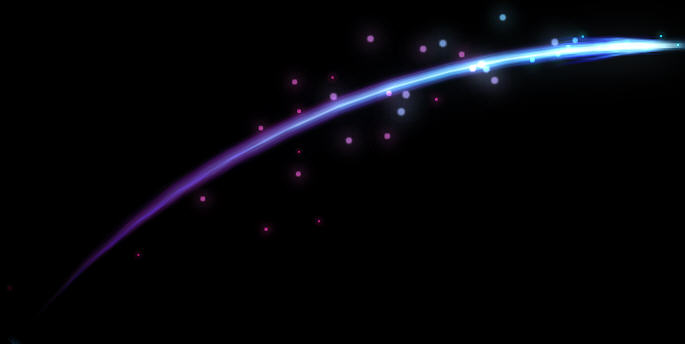
This is starting to look a lot like a missile, it's just a little too short:
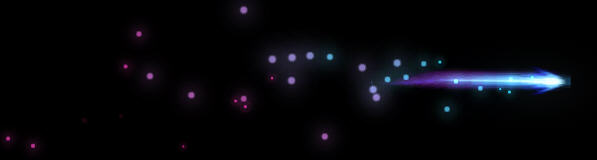
On the particle system, look for a section of properties called Ribbon Properties and change Length to 25. Nothing will happen immediately, you need to hit the circular arrow button to reset the system and see the change.
The ribbon trail is a lot longer now, but you can see it looks kind of weird and jagged as it turns corners. This is because it only has three segments. Change the Segments property to 15, and then change the Length down to 15. Hit the circular arrows to reset the system, and it should look much better.
This can be a finished missile particle, but lets add a Sine Force affector to the ribbon system and see how it works. Set these properties on the Sine Force affector:
- Set Force X to 5
- Set Max and Min both to 15
Hit the circular arrows to reset the system. The ribbon is now moving with a sine wave on the Y axis, so it bobs up and down. Since it's moving a lot more, you may want to increase the number of Segments in the ribbon trail, I changed mine to 25.
That's it for this tutorial, but you should play around with the properties on these systems to see what they do, and try adding additional systems. To make a finished missile, you'll also want bursts for when the missile hits things and maybe a different burst for when it dies without hitting. Those will be saved in different files.
Have fun!