Your First Particle System
What is a particle?
Particles are the special effects of video games. Explosions, magic spells, fires, water splashes, and billowing smoke are all usually made out of particles. They can also show up in places you might not expect; bugs flying through the air are particles, as are some monster weapons. If you're tricky enough, you can make pretty much anything out of particles. The trick is to make something that both looks good and is reasonably cheap to render.
To make good particle systems, you're going to have to do a lot of poking around on your own. There are lots of ways to achieve any given affect, and it's a creative task as much as a technical one. These tutorials will give you the basic knowledge you need to get started, but you'll learn a lot more afterwards by making your own systems and by opening existing particles to see how they work.
I'm looking forward to seeing what you make! − John Dunbar
Making your first particle system
In this tutorial we're going to learn how to use the particle editor, and explore some properties and affectors. The goal isn't to make anything specific, but to help you get a handle on how the editor works so that you can make whatever you want.
Lets get started!
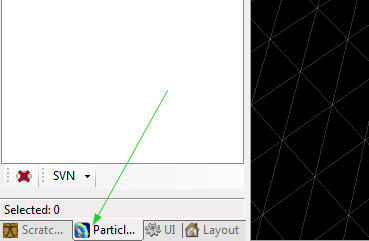
Open up GUTS (the editor) and make sure the left pane is on the particle tab.
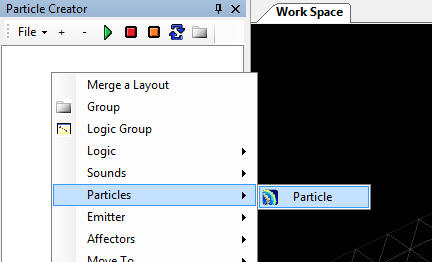
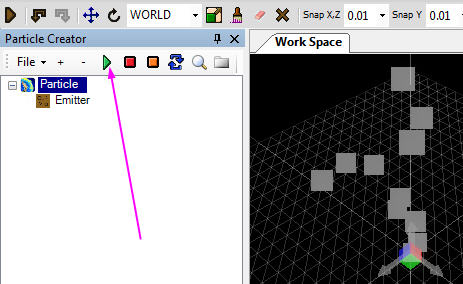
Now, right-click in that big white box on the left. You'll get a list of objects you can create in there. Choose particle -> particle.
There you go, you've made a Particle. Done!
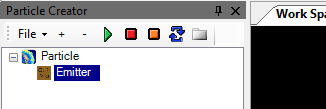
Ok, not quite done. This particle doesn't do anything, because it doesn't have an Emitter. Lets add one. Right-click on your new particle object in the right hand pane, and choose Emitter -> Emitter.
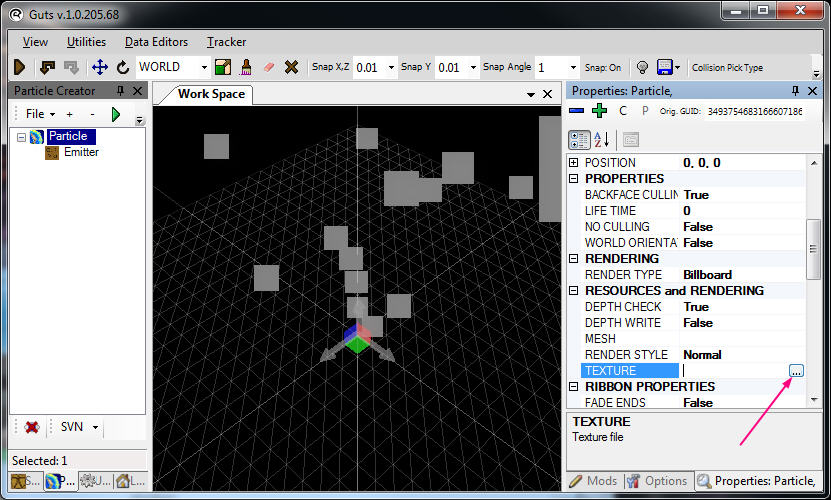
Now it should look like this:
The emitter is indented because it's inside the particle. Click the little green play button and your particle will start to emit.
Your particle system is now functional, but it's not very pretty. It's just emitting lots of grey squares. Lets make those look like something else.
Click on the Particle object in the left pane to select it. Make sure the Properties tab is selected in the right pane, and look for the property called Texture. Click in the box to the right of the word Texture and then click on the ellipses (...) to select a new image.
If you have the game files, you can look through the images we used to make all the particles in the game. They're in media/particles/textures. For now, select:
media/particles/textures/Flash/Flash09.dds
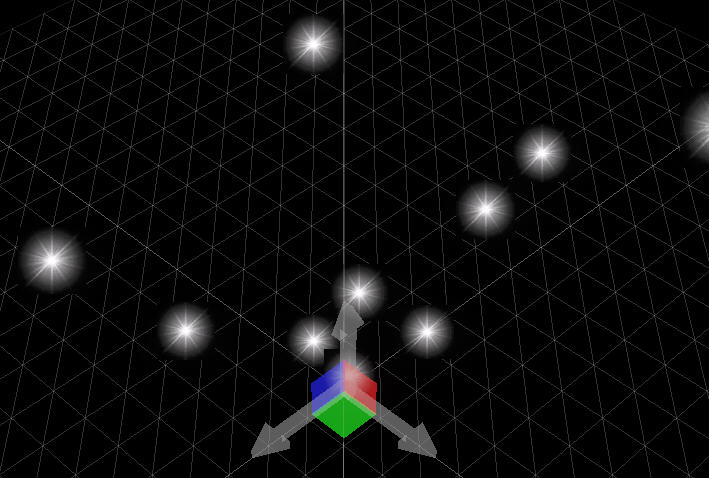
Now the grey squares have turned into the image you picked, but if you look closely you can see that the square black background still shows up.
In the particle properties find Render Style and set it to additive. You can Google additive blending to learn more, but basically it means black parts of the image won't be drawn, and overlapping images will become brighter. Notice how the stars get really bright now when a few stacked on top of each other, and the black squares around them are gone.
Ok, lets change some properties on the emitter. Click on the emitter in the left hand pane to select it, and then look for the ParticleLife property in the right hand pane. Click the ellipses just like you did to set the texture earlier. In the drop-down box make sure RANDOM is selected, and then set the min to .5 and the max to 1.5. Hit enter after typing values in the editor to make them update.

Now all the particles spawned from that emitter will last between .5 and 1.5 seconds.
Lets change the size of the particles next. Look for the ScaleOnLaunch property. Open it like you did the last one, and set the min to .1 and the max to 1.5. Now the particles will randomly spawn between 10% and 150% of their normal size.
Change some more properties in the same way:
- Set ANGLE to 0. This will make the particles come out in a straight line instead of in a 45 degree cone.
- Set Type Of Emitter to Circle. Now the particles will spawn in a ring. You can control the size of the ring too, but leave it alone for now.
- Set Velocity to be random between 0 and 2. This is the initial speed of the particles.
- Set EmitRate to 30. This is the number of particles emitted per second. High numbers here can hurt performance, so try to keep this low.
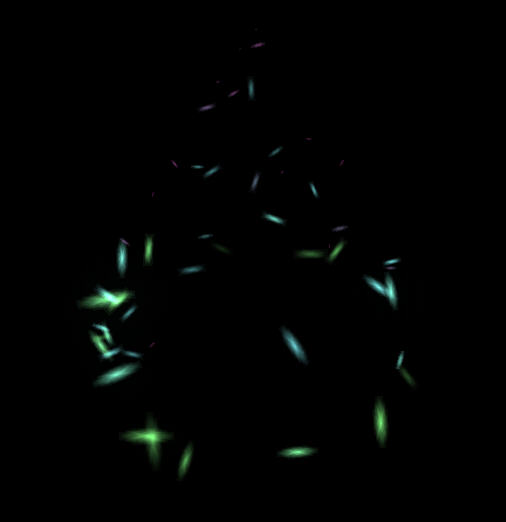
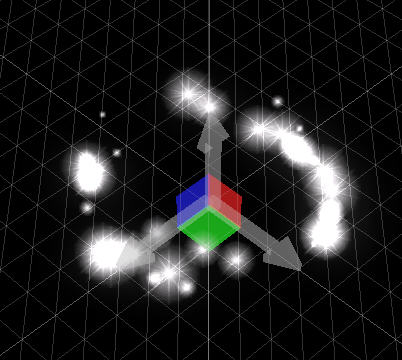
Your particles should now look like this:
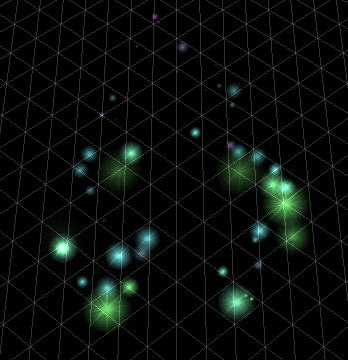
It's starting to look like a magic ring now, lets add some color. Right click on your particle object in the right pane again, and add a Color affector.
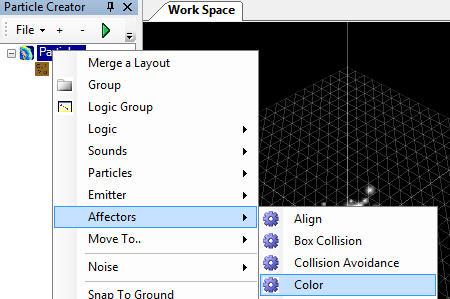
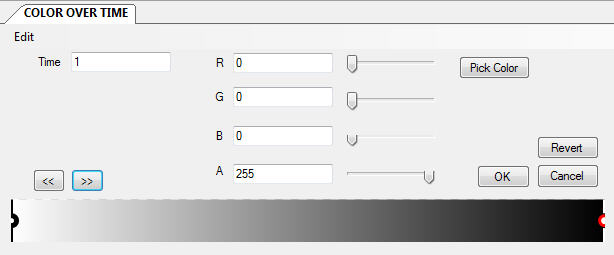
Now you can click on that Color affector to select it, and open up the Color Over Time property in the right hand pane. The bottom part of this window is a big white bar. This bar controls the colors of the particles over their lifetimes'. All particles in this system will start as the color on the left side of the bar, and end on the color on the right side of the bar.
Right-click on the bar to add a point, and then drag that point all the way to the left. Use the sliders to set the RGB values to 0 for that point, so that it looks like the picture below.
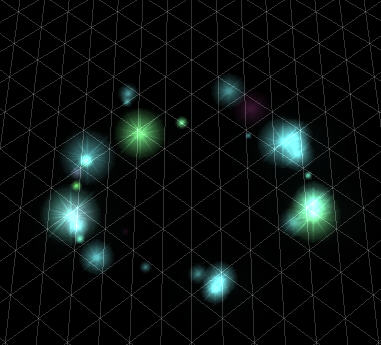
Now all of the particles change from white to black over time. Since these particles are additive, black is invisible, and the particles fade out over time. Notice how the stars now flash into existence and then slowly fade away. Add some more points to the color affector's bar, and try to find some colors you like. Selecting nodes and then using the Pick Color button will make it easier.
Mine looks like this now:
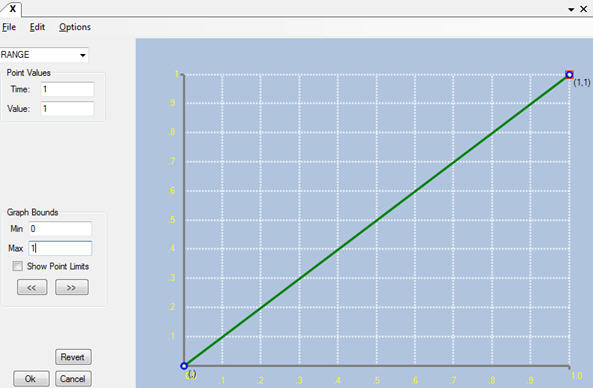
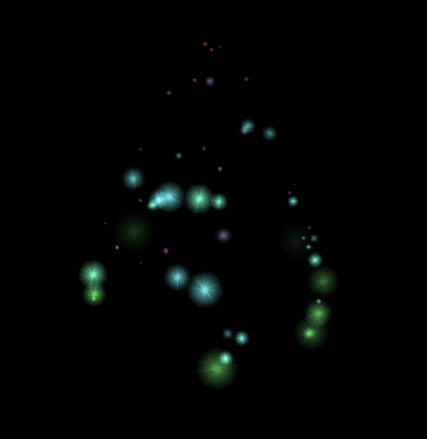
Now add a Scale affector, in the same way you added the color one. Select it, and set its Fixed property to true. This will make it scale the same in all dimensions. Now, open up its X property, and change the drop-down to Range. This will allow us to change the scale of particles over their lifetime in the same way we controlled the color. Right-click on the grid to add points. Lets start with two points, one at (0,0) and one at (1,1). This will make the particle 0% scale at the start of its life and 100% scale at the end. Setting the numbers in the Graph Bounds boxes makes it easier to drag the points into place.
Your particles now start out tiny and bright and grow larger as they fade out. For practice, try reversing that. Make them start large and dim and then shrink and become brighter. To do that, you'll basically reverse the order of the points on both the scale and color affectors. Also, up your EmitRate to 50. It's a lot, but it will make it easier to see what the next few affectors are doing.
Add a Linear Force affector to your Particle object, and select it so you can change the properties. This affector can add a bit of force in a particular direction every update. Change the Y value to 6. Now the particles will accelerate as they float upwards. Also try setting the X and Z properties to different values to see the effect. Using these is a good way to simulate wind. Set X and Z to 0 before moving on.
That is one magicky looking ring you have there! Lets add a Gravity affector now. Add a Gravity Well to your system, and set its Gravity property to 15. Unlike many affectors, the position of this one actually matters. It will pull particles toward it, or repel them if its Gravity property is set to a negative number. Change its Y position to 3, and your system should now look like this:
It doesn't show up well in screenshots, but your particles should be forming a cone shape. Now, add a Vortex affector and see what that does. Vortexes move all particles in the system around themselves; the further a particle is from the center of the vortex the faster it will move. Try changing the Vortex's Rate property from to -.75, that will slow it down and make it spin in the opposite direction. Also, try hitting CTRL-G to turn of the editor's grid so you can see your pretty particle cone.
There's one more common affector we should look at before ending this tutorial. To get ready for it, select the Emitter and change the Width property to .3. This will make all of your particles much narrower, which will make it easy to see the rotation we're about to add.
Add a Texture Rotate affector. Find its StartingRotation property, and set it to be random between 0 and 6.283. This property is in radians, so 6.283 is 360 degrees and that setting will make the starting rotation completely random.
Now, set the Use Own Rotation property to true, and then open up the RotationSpeed property. Set that to random between -300 and 300. If you watch your particles they should randomly spin either clockwise or counter-clockwise towards the top of the cone.
Last thing, you should know how to make burst particles, those are pretty important. On the emitter, set the EmitDuration property to 0, then hit the green play arrow again. The particles will all emit in one burst, and then the system is done. Use this to make any bursty particles, like explosions or hits.
Change EmitDuration back to 1 to make the system emit forever again. You may have to save and reload the system in the File menu if it seems to be stuck in burst mode.
That's it! You've got a good first system to play with. Try poking around and changing different properties, or think of something in particular you'd like to make and try to mold this system to look like that. The more you understand the properties and affectors available, the more you'll be able to do.
Have fun!