Outdoor Level Chunk Tutorial
What we’re going to do here is make another Entrance chunk for Act 2 Zone 2, otherwise known as the Salt Barrens. Most of the areas in Torchlight II are made up of level chunks, and the game uses these chunks to build a level. We do this in order to provide a randomized experience for people as they play the game multiple times. An Entrance is a special type of chunk where the player enters the area. Chunks should line up perfectly with other nearby chunks as the game uses them to build a level, so they all have to follow certain rules around their borders. Luckily, we have made a number of templates for various chunks so that you know where you can build.
Contents |
Getting Started
- First things first, open up Guts. Having a two monitor setup is really helpful for using just about any game editor. Guts is no exception.
- Download this zip file. File:Outdoor Chunk Tutorial.zip It contains different versions of this tutorial layout at various points along the way.
- If you haven't created a mod directory, do so. There is a tutorial for that here: Creating a Mod
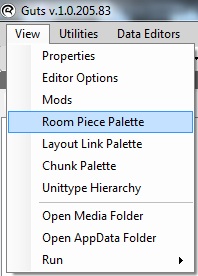
- If the Room Piece Palette and Layout Link Palettes aren't open, go to View in the top left of the Guts window and turn them on. If you have a two monitor setup, you should probably put these windows on the other screen.
- If you don’t know how to control the camera, refer to the Keyboard Shortcuts tutorial first.
- On the left of the Guts main window, there’s a big white area. At the top, it should say “Layout” in a gray bar. If it doesn't, there are a number of tabs in the bottom left. Click on the tab that says “Layout”.

Setting up the Template
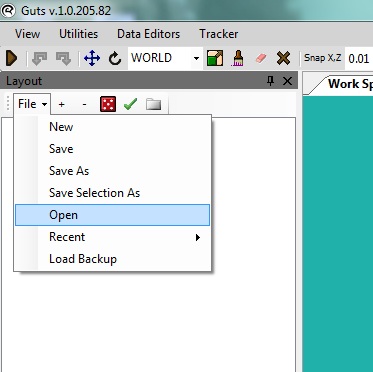
- Click on File, then Open. Go to Media\Layouts\Act2_Z2\Templates\1X1_Entrance_N1S1E0 and open the layout there.
- Save the template as 1X1Entrance_N1S1E0_YourName in the Media\Layouts\Act2_Z2\1X1_Entrance_N1S1E0 Folder. When the prompt to save in the mod directory comes up, save it in the mod directory. It’s important to keep the first part of the file name the way it is because the game uses that name as a guide for how to put the chunks together. The 1x1 indicates that it’s a single chunk (we pretty much only use 1x1) followed by Entrance, which describes what type of chunk it is, followed by N1S1E0. This is a little code that basically means “Part open, part mountain on the north, part open and part mountain on the south, completely open on the east, does not connect on the west.”
- You have just created a new layout file. Layout files generally hold stuff that gets placed in the world, logic, etc.
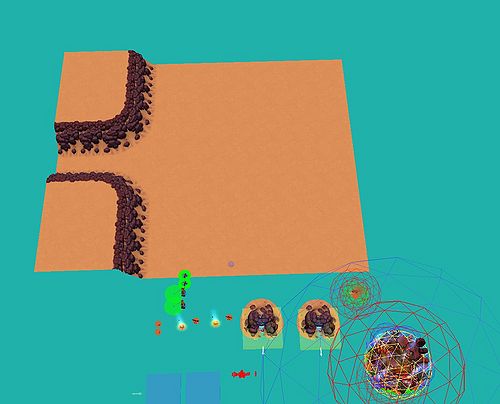
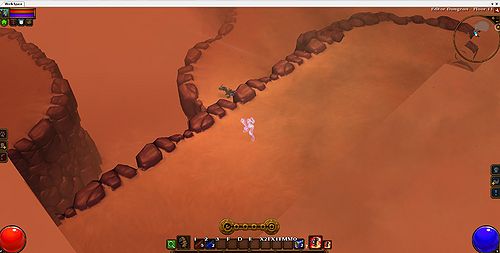
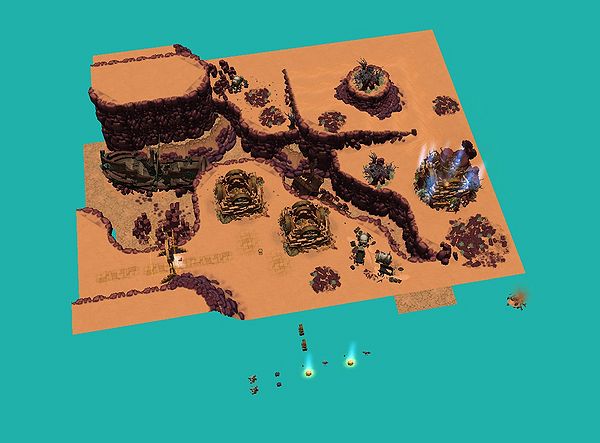
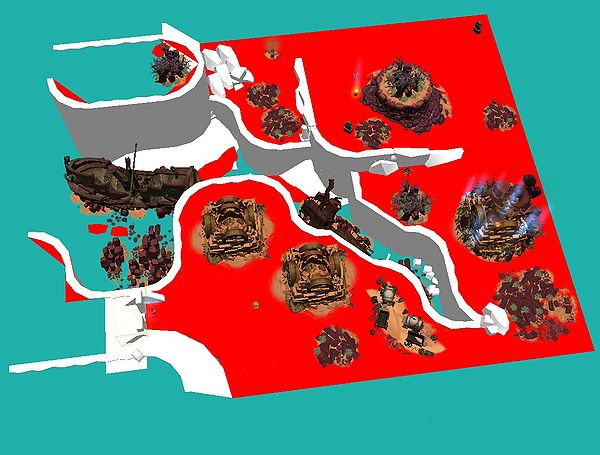
- Look around in the template. There are a few things already in the level, and I’ll explain what those are in just a moment. First, float the camera up above the whole area and look down at it, like in the screenshot provided.
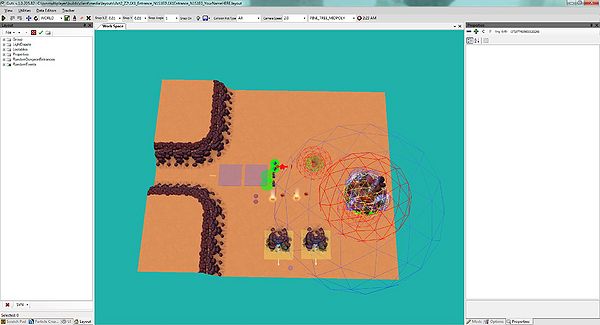
The top, right, and bottom edges need to match up perfectly with the chunks that will eventually get placed nearby, so you should make sure you leave those edges untouched. Later on, be sure to not put anything with collision right up against the edges. That could cause complications when this chunk gets randomly matched against another chunk. The left (west) side is not quite as important. Because it doesn't have to match up to another chunk, you don’t have to be quite so careful.
- By now you've noticed the huge mess of brightly colored shapes and other objects. You can press ctrl+h to turn helpers on and off.
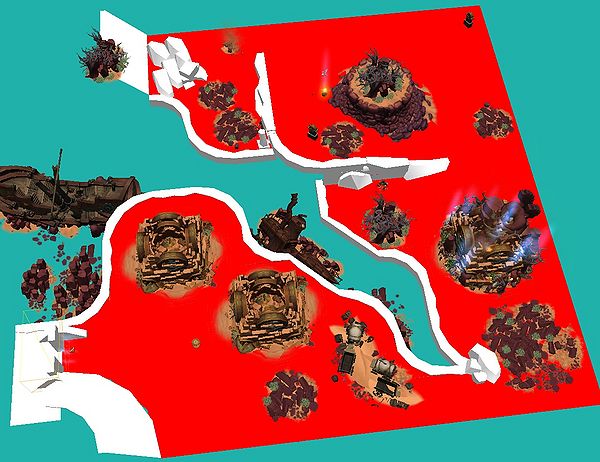
- There are two main ways to select items in Guts. One way is to pick them in the Work Space window, and the other is to pick them in the Layout bar on the left. Some things (such as the blue boxes that can be seen with helpers on) can only be selected via the Layout window. The first thing we should do is move all of the stuff in the layout to beyond the edges. Eventually we’ll move it back in, but we need to build stuff there first. In the Layout window on the left, you’ll notice a bunch of Groups (basically they’re folders) and you can press the + next to them to expand them. You can also press the + right next to “File” and expand every group as well. You’ll want to expand every group and subgroup except for the groups called “Group” and “LightDapple” just like in the screenshot.
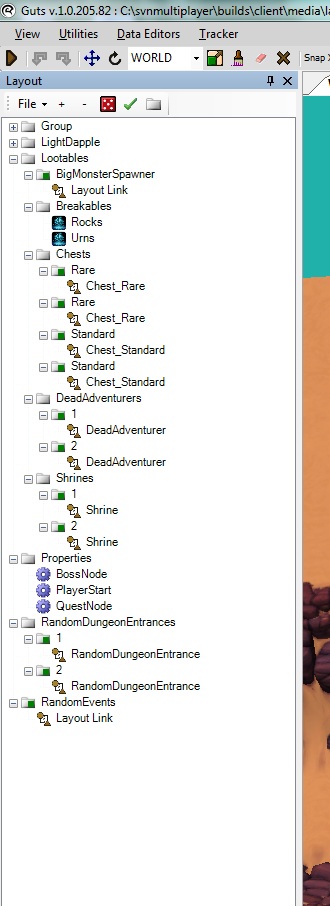 Once the groups are expanded, it should look like this.
 - First up is the Lootables group. This contains most of the chests and loot and whatnot you’ll find in the level. Most of this stuff is set up in a special way so that the lootables only have a chance of showing up. When you place a chest, imagine that you’re placing the possibility of where a chest may go. You may notice that many of the groups inside Lootables have a green square on them. If you click on the group and then check out its properties on the right hand side of the editor, you’ll find a field called “Tag”. In the case of the screenshot, I have the group Lootables\Chests\Rare selected. The Tag CHESTS_SPECIAL tells the game that this group contains a good chest. You don’t have to know what all of the tags mean, though. It’s already set up properly for you, so all you have to do is place them. One thing you do need to know is that if you ever delete everything out of a group with a green square, you should delete the group as well.

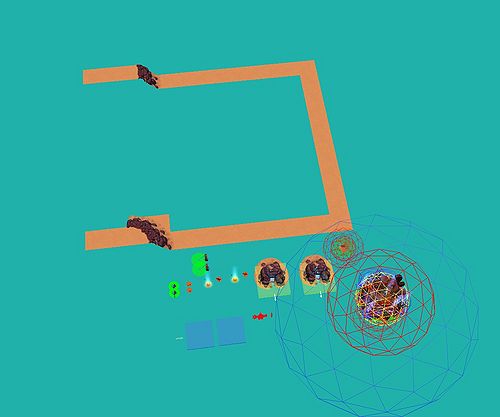
- You’ll want to move the items in Lootables and drag them out of the main area you’ll be working in. Don't move the groups, instead select the actual items in the groups and move those. Some items like the rock and urn spawners can only be seen with the helpers (ctrl+h) on. Your area should now look something like this:
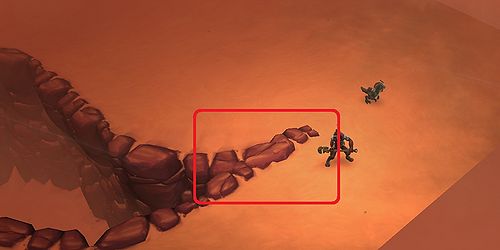
- Now you can choose to use this as your base and start adding rocks and whatnot, but that would be boring. I’m going to delete everything except for the edges. Here’s a screenshot of everything up to this point, and another save file of the progress. Notice that I dragged down the curved wall piece and some of the matching floor pieces to the south edge. It will still match up to nearby chunks because the very edge is still the same. A few tricks to quickly delete lots of objects: You can marquee select with shift + right click. This works best when you are looking straight down at the map. Once objects are selected, you can press delete to delete them. You could also hold ctrl down and click on multiple objects to select them, and then delete them all at once. You could also select all of one type by pressing F4 with one object selected, and then use ctrl+left click to deselect the objects you want to keep.
- Tips: You can turn snaps on and off by pressing “t” but you’ll generally want snaps on when working with kit pieces (floors, walls, etc.)
- At this point, we have reached the level of progress in 1X1Entrance_N1S1E0_YourNameHERE_v2.layout.
Making the Basic Shape
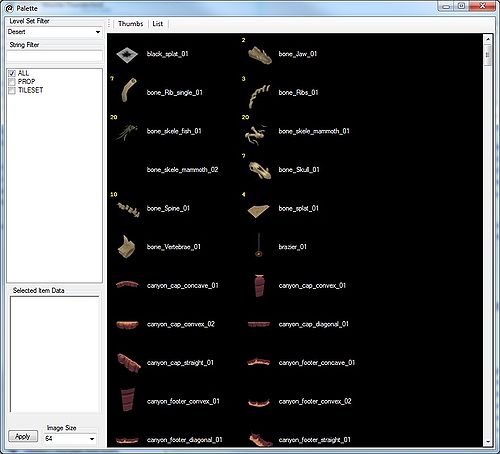
- Now that we’re done moving stuff around and deleting the things we don’t need, it’s time to start adding things to the level! First thing we’ll need to do is make sure the Room Piece Palette is open. You can bring it up under “View” if it’s not open already. Then, set the Level Set Filter to “Desert”. After you set it to Desert, check the “ALL” box. You should see everything in the Desert Set. We also use props from the Desert Cave set in desert, but we use those sparingly – usually for special areas like the Genie’s area.
- For the following section, make sure snap is on (either click it on the top bar or click on the Work Space and press “t”. You can get room pieces from the Room Piece Palette three different ways. The first way is to doubleclick on a Room Piece in the Palette. That will make a new group with the room piece in it. The second way is to select an item in the Palette and then highlight the Work Space, and then press the Space Bar. USE THESE METHODS SPARINGLY. I pretty much only use them when I have a completely blank space. It makes a new group every single time you do either of these methods, and that can become a huge pain as soon as you need to start moving around a bunch of room pieces. The best way to do it is to go into the Work Space, select an object that already exists, hold the shift key down, and either press an arrow key or drag the selected piece with the widget on-screen. This will duplicate the room piece. Then go into the Palette with that newly duplicated piece still selected, and doubleclick on the object you want. This sounds like a lot of work, but it does two important things: It keeps everything in the same group, and once you figure out the workflow, you start looking for examples of that piece already in your layout and you can just duplicate that instead. I’d suggest, as an exercise, that you select one of the floor pieces that already exist in the layout and hold shift, and then press the left arrow. You should now have a new floor piece that you can move around freely. If you keep shift held down, you can quickly make paths this way. Holding ctrl down and then pressing left and right arrow keys will rotate pieces. Holding ctrl and pressing the up and down arrows will make the pieces move up and down. It should be noted that any properties set on the duplicated piece will also be duplicated, so if collision is turned off or something like that for one piece, you’ll have to make sure to turn it back on for the duplicated piece. Pretty much everything in the template is at default settings, however, so you won’t need to worry for now about that. Even if you do run into trouble later on, it’s easy to reset those properties.
- The first phase of building any level is to get some idea of what you want to do with it. With something as small as a chunk, you don’t have the flexibility to really make much in terms of grand design, but you can definitely get some cool content in. With it being a chunk that doesn’t have to connect on the western side, you can build some features that extend off into the distance and imply much more about the surrounding world without actually showing it. I’m thinking of making some sort of chasm and either a bridge or a treacherous path that the player has just come from. It’s important to have flexibility in your design. Sometimes things don’t work out as expected, so it’s good to have some sort of fallback design.
- Once you have an idea of what you want to make, follow the steps detailed here: Level Building Overview
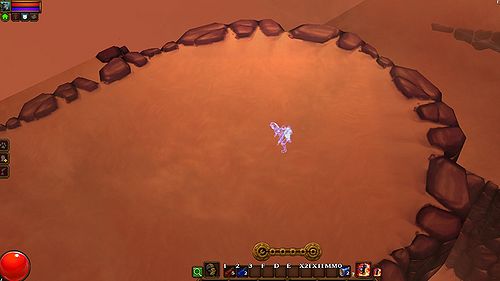
- Here’s a screenshot after the “Make the Basic Shape” stage:
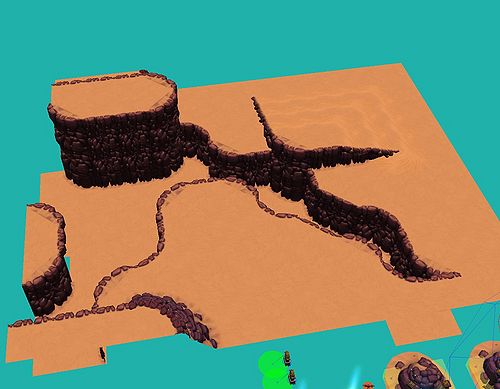
- At this point, we're up to layout file 1X1Entrance_N1S1E0_YourNameHERE_v3
- Under “options” (A tab in the bottom right) I set the Rules Set to Act2_Z2\salt_barrens_rules.template beings this chunk will go to the Salt Barrens. This will set up the lighting and camera zoom to the correct levels. It may not be possible to do this on your computer, but it’s recommended if possible to go to the options tab, find the “In Game Res” section, set Override Res to True and then set the size to 1920, 1080. This will let you be able to view your level at the largest supported resolution to check for bugs like the player being able to see into the void.
- Fair warning: Until you decorate the area, it’s going to look pretty boring. There really aren't too many details yet and everything’s going to look flat. That’s ok, though. There has to be a basic shape before it can get fully decorated.
Checking your work after putting in the basic shape
In the v3 version of this layout, it’s pretty obvious that there are some issues right off the bat. If you hold control and then right click on a walkable space, you can play from there. Here are some screenshots of various problems.
- Here are some issues right away – The player can get deep behind a wall and can see the void on the south and east sides. The recommended fix here would be to place some large blocking structures like rocks here, or make it so the player can’t walk over here in some other way.
- There’s a texture flicker where these two tileset pieces meet. They’re not really supposed to be used like this, so overlapping problems will arise. It’s ok, though, because stuff like this can get covered up and no one will ever know. Even though you can see the void here, it’s ok because that is where the other chunks will meet up.
- Here is a place in the north part of the map where the player can really get hidden behind some rocks. It would not be good to have to fight monsters back here. To fix this, we could either lower the wall or build stuff out so the player can’t walk back there.
Add Big Decorations
At this point, you can start adding some big blocking stuff to fix some of the issues that were discovered. You can also refine your ideas for your level as you work. Think of what you’re building as a story. There is a history to the area that is implied without words, and you are building that history as you go. Beings one of the features of the Salt Barrens is a large lake filled with ships, I figured I could do some foreshadowing of that by turning the relatively straightforward sandy ground at the bottom of the canyon into dried lakebed. You can do this quickly by picking on one of the pieces down below and pressing F4. This selects all of the same type of object. Then you can hold ctrl and deselect all of the objects that aren't part of the lakebed. Then find the Noshadow_desert_lake_bed piece in the palette and double click on it. You've now turned the bottom area into a lake bed! There are some large ships you can use to decorate the lower area. There are some layout links in the folder Props\z2Desert_Props\ that are good, and it would be a good idea to poke around and see what you can find in there. There is a \Randomized subfolder that has a lot of layout links that are good for decoration as well. They look cluttered when you place them, but they will only use a few of the decorations when you actually play in the level. This is a good time to place the layout link inside of the RandomEvents folder as well, as it’s pretty big and you’ll want to be able to fit one into the chunk. More info on Layout Links.
Entrance Setup
With this chunk being an Entrance, something special needs to be done so the player knows where to warp in, and what area this area connects to. First, open the Properties group and create a new layout link. Then in the Properties set that link to “MEDIA\LEVELSETS\PROPS\PORTALS\ACT2\SALTBARRENSTOVULTUREPASS.LAYOUT”. This chunk is in Salt Barrens, and it takes you to Vulture Pass, hence the “Salt Barrens to Vulture Pass” layout link. The second thing to do is to create a NoSpawn area. To do that, Right click on the Properties group, go to “Logic” and then pick Property Node. Rename it to “No Spawn” and then on the right under properties for Property Node, set the TYPE field to “No Spawn Region”. Then, scale the No Spawn Region to an area that’s large enough to cover a bit more than a screen’s worth of area. You do this by holding “C” and dragging the widgets, or by manually setting the Box Length and Box Width fields. 50x50 Is more than adequate. You want to put this in so that monsters don’t surround you just as you spawn into an area. Later on if you keep accidentally selecting this box in the editor, you can set the “Visible” property to False. Last, move the player start (located in the Properties group) in front of the newly created layout link with the entrance info in it.
- At this point, we've caught up to the progress in 1X1Entrance_N1S1E0_YourNameHERE_v4.layout. In v4, the Entrance is properly set up and some major items have been added. I rearranged the layout right at the very entrance because I didn't like the way that it was connecting. I also added some salt flats decoration to the lower area and some large, basic randomized layout links as well. With an entrance, you may not want to put random dungeon entrances in the chunk because you don’t want to walk into a level on a quest only to immediately go down into a dungeon. That detail, combined with the fact that there didn't really seem like a good place to put a dungeon entrance in my chunk caused me to delete them. Please note that I didn't just delete the layout links, but I deleted the groups with the green squares that contained them. If you don’t delete the groups as well, the world generator will think that it’s turning on a dungeon entrance but is instead turning on an empty group. I also cleaned up some of the places where the tileset didn't really fit together properly.
Add Scripting, Features and Loot
At this point it’s good to add all of those items that were dragged off to the side. Be sure to turn on helpers with ctrl+h so you don’t miss any. You don’t want to put loot too close to the entrance because it would be kind of lame to walk into an area and see a gold chest right away. You may want to delete the good chests (and the group that contains them!) out of an entrance chunk. I placed the Rocks object found in Lootables/Breakables in the north east area because that zone is fairly sandy and unpopulated. I placed the urns around the houses and sandstone path because it makes sense that a few urns would be there. If there were no man-made structures in the area, I’d probably just delete the urns. I also scaled the spawn areas to increase the area at which they would spawn and then sunk them into the ground so they weren't in the way. Don’t worry, they’ll still spawn if they’re underground. We’re not really going to get into scripting with this one, and the RandomEvents folder has the potential to contain something interesting and scripted in there. At this point we've matched the progress found in 1X1Entrance_N1S1E0_YourNameHERE_v5.layout.
Add Detail Decoration
At this point, you’re probably going to be doing a mix of moving around or adding big stuff as well as adding lots of small stuff. The easiest way to add small stuff is with the Brush Editor. You may want to go through the Using the Brush Tool tutorial before doing this part, as it will speed up the process of placing small objects.
- Here’s a nearly complete version of the chunk.

- 1X1Entrance_N1S1E0_YourNameHERE_v6.layout has lots of smaller decorations, but still needs some additional work.
- The area should look like the final version when you walk around, but it still needs to be cleaned up. We need to turn off collision in unnecessary places, turn off unwanted pathnodes, and add places where monsters can jump down. Here’s a shot of the area with collision view turned on (ctrl+shift+k).
- White is regular collision. Projectiles will bounce off of it, and it will prevent pathnodes from drawing in certain locations. The red is walkable collision, where pathnodes will draw. We need to turn off the extra collision to improve performance, and we especially need to turn off walkable collision where the player can’t go. Monsters could spawn in various places where we don’t want them to spawn. When you select a room piece, (or multiple selection with ctrl held down) you can go to the properties window and set the COLLISION ENABLED field to False. If you hold ctrl+shift and press “k” twice, the collision will update.
- This screenshot has collision cleaned up, although there are a few more things that need to be done here. First, the layout links that shouldn't have collision need to have their NO ROOMPIECE COLLISION flags set to true. Second, jumpdown volumes need to be added to the ledges of the overlook. Those are the orange boxes shown in the screenshot:
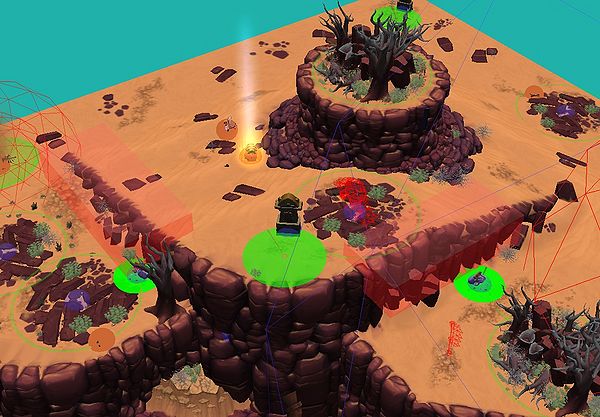
- Like the No Spawn Region, Jump Down Regions are Property Nodes. Create a new group called “Jump Downs” and make a property node in there. Then change the TYPE field on the property node to “Jump Down Area” and set them up along any location where enemies should be able to jump down. Last, we need to address the area shown in the screenshot.

This area can get enemies and loot spawning in the red areas that are surrounded by white. The player can’t get back in there. What we’ll do to fix this is to put a Path Node Occupation box in that area. This makes pathnodes in that area invalid. This is also a type of property node. You can duplicate a Jump Down, change its type (and change its name so you don’t get confused) and make a new group for it called “Path Node Occupation”. You want this box to completely cover the red areas that are blocked off from the rest of the red areas, but you don’t want to cover any of the rest of the red areas, because then people won’t be able to walk there.
- After you do all of this, you will want to walk around your area. Hit M to get the map in the center of your screen, and hit ] a few times to make the map big. The map is generated off of where people are allowed to walk and where things can spawn, so if you see little chunks that aren't attached to the rest of the map, you should investigate and apply some more occupation boxes or turn off collision on a piece. You can also bring up the console and type “showpathnodes” and that will help you see exactly where trouble spots are.
- After you’re done verifying that there aren't any pathnode issues, the level is done!